
A couple of weekends ago, we celebrated Dahlia’s baptism. She did an awesome job and didn’t cry (woohoo) – she actually made us smile & laugh because she was so animated & silly during the service.
We kept her baptism small & intimate and kept the costs down by doing a lot of the decorations ourselves because we are in the midst of a kitchen remodel and we all know that can get costly. We also rented out a space in a rec center next door to the church and though it was small, I still wanted to make it special for Dahlia. Here are 10 easy things you can do to make your next party/gathering/baptism less expensive too.
1. DIY photos (in her baptism dress)
This was super easy to do. I picked a spot in our house that gets a lot of natural light & snapped away. Then, I went to CVS to print out copies (11 cents for 4×6) and used one for the reception welcome table & gave 4 different photos to her Godparents as part of their ‘Thank You’ gift.


2. DIY “I am a Child of God” Sign
I made this sign also for the Welcome Table. I thought it added a nice touch. I made the “I am a Child of God” sign on the computer as a word document and then traced it with gold glitter puff paint. Then, I framed it in a white frame I hadn’t used that was lying around the house and painted it pale pink.
You can find the Sign Here: file://localhost/Users/keoana64/Desktop/I_am_a_Child_of_God/Slide1.jpg

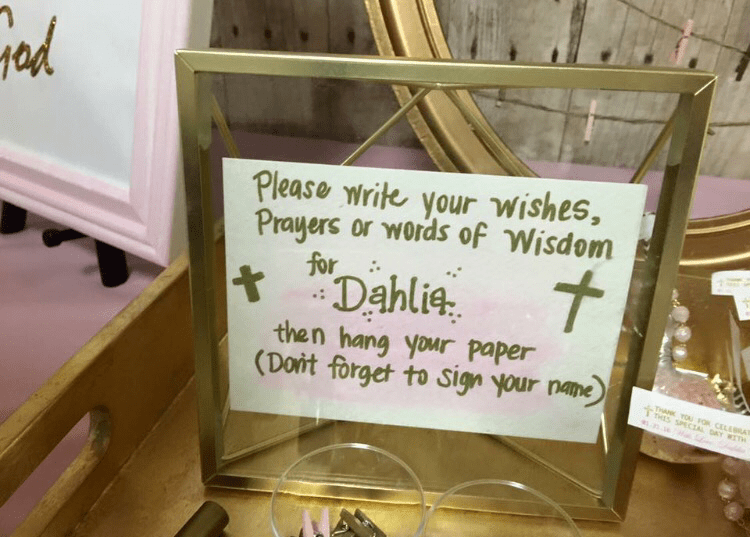
3. DIY Guest Book/Well Wishes
For the ‘guest book,’ I used a gold oval frame that I usually have on display in my house and attached string zig-zagging in the middle and clipping mini pink & gold clothes pins (Recollections Brand from Michael’s) so the guests could hang their well wishes, prayers or words of wisdom to Dahlia. I also bought the tags from Michael’s as well.
I bought the oval frame at the Treasure Island Flea Market a couple of years ago and spray painted it gold. For the sign, I water colored ombré pink as the background and used another gold frame from my house. 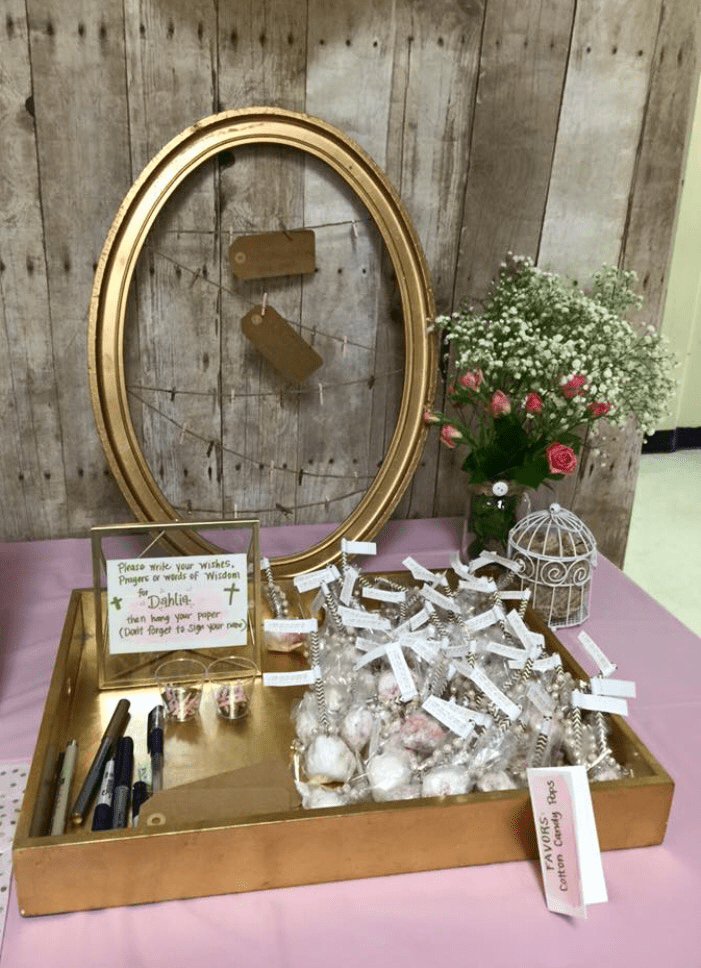
4. DIY Gold Chocolate Tree
Oh yes, this was super fun to make! And who doesn’t love chocolate?! I
I bought a pack of Ferrero Rocher chocolates at Costco and used a gift box (from Christmas) & molded it into a cone shape. From there, I glue gunned the chocolates from the top down. When I was finished, I trimmed the paper cone at the bottom to make sure it stood on its own. Finally, I added gold ribbon at the bottom as trim and added a pink bow at the top!
Voila! Gold Chocolate Tree! 


5. DIY Tissue Paper Pinwheels for Decorations
For the backdrop of the Welcome Table/Dessert Table, I re-used a faux wood paper I had from my baby shower. If you follow my blog, I have re-used this paper many, many times. I tell my sister it’s the best $8 she’s ever spent (Thanks, Jenn! hehe) She bought it at JoAnn Fabrics & I use it for everything!
Anyways, I wanted to create a fun & cost-effective backdrop so I bought 3 packs of tissue paper from Target: a variety of Pink, Gold and White with Gold Polkadots. SCORE!
Follow the tutorial video here: https://www.youtube.com/watch?v=QaSGI3o6RGY
You can make your pinwheels all different shapes, do two colors at once or make the edges different too!
Here is how it turned out:


6. DIY Paper Flowers for Centerpieces
Instead of buying real flowers for the centerpieces, I used paper flowers instead and created trios for the 6 tables we had set up.
My husband’s aunt actually went to the Meri Meri (Party Supplies/Stationary Maker) Warehouse Sale and gave me a pack of these paper flowers that I taped together. Luckily, they were all pink & gold so it fit the theme. All I did from there was hot glue them to small plastic shot glasses so they could stand on the tables and placed 3 of them for the centerpieces. We also used the remaining gold polka dot tissue paper underneath the paper flowers to give it a more ‘centerpiece’ feel.

7. Cotton Candy Pop Favors
When thinking about what to do with the favors, I kept thinking, “what’s pink?” Cotton Candy, of course! I also came up with the idea of making Cotton Candy Pops so I could attach a mini rosary as the favor.
So, I researched in the Bay Area and found that Sugar & Spun (A SF Based Cotton Candy Company) makes really awesome flavors. And just before I went out to seek them, my husband comes home with 2 little bins of them from a work event. SCORE! He picked up the Strawberry Nutella and Peanut Butter Chocolate Flavors. Perfect!
To assemble, I cut gold chevron straws in half that I found at Target and used baking gloves to handle the cotton candy and grabbed some to create a ball on top of the straw. Lo-and-behold, it looks just like a lollipop! So, I covered them with plastic and sealed it tightly and glued the favor tags to the ends of the straw and placed blush pink mini rosaries I had bought on Etsy via AVAandCompany.


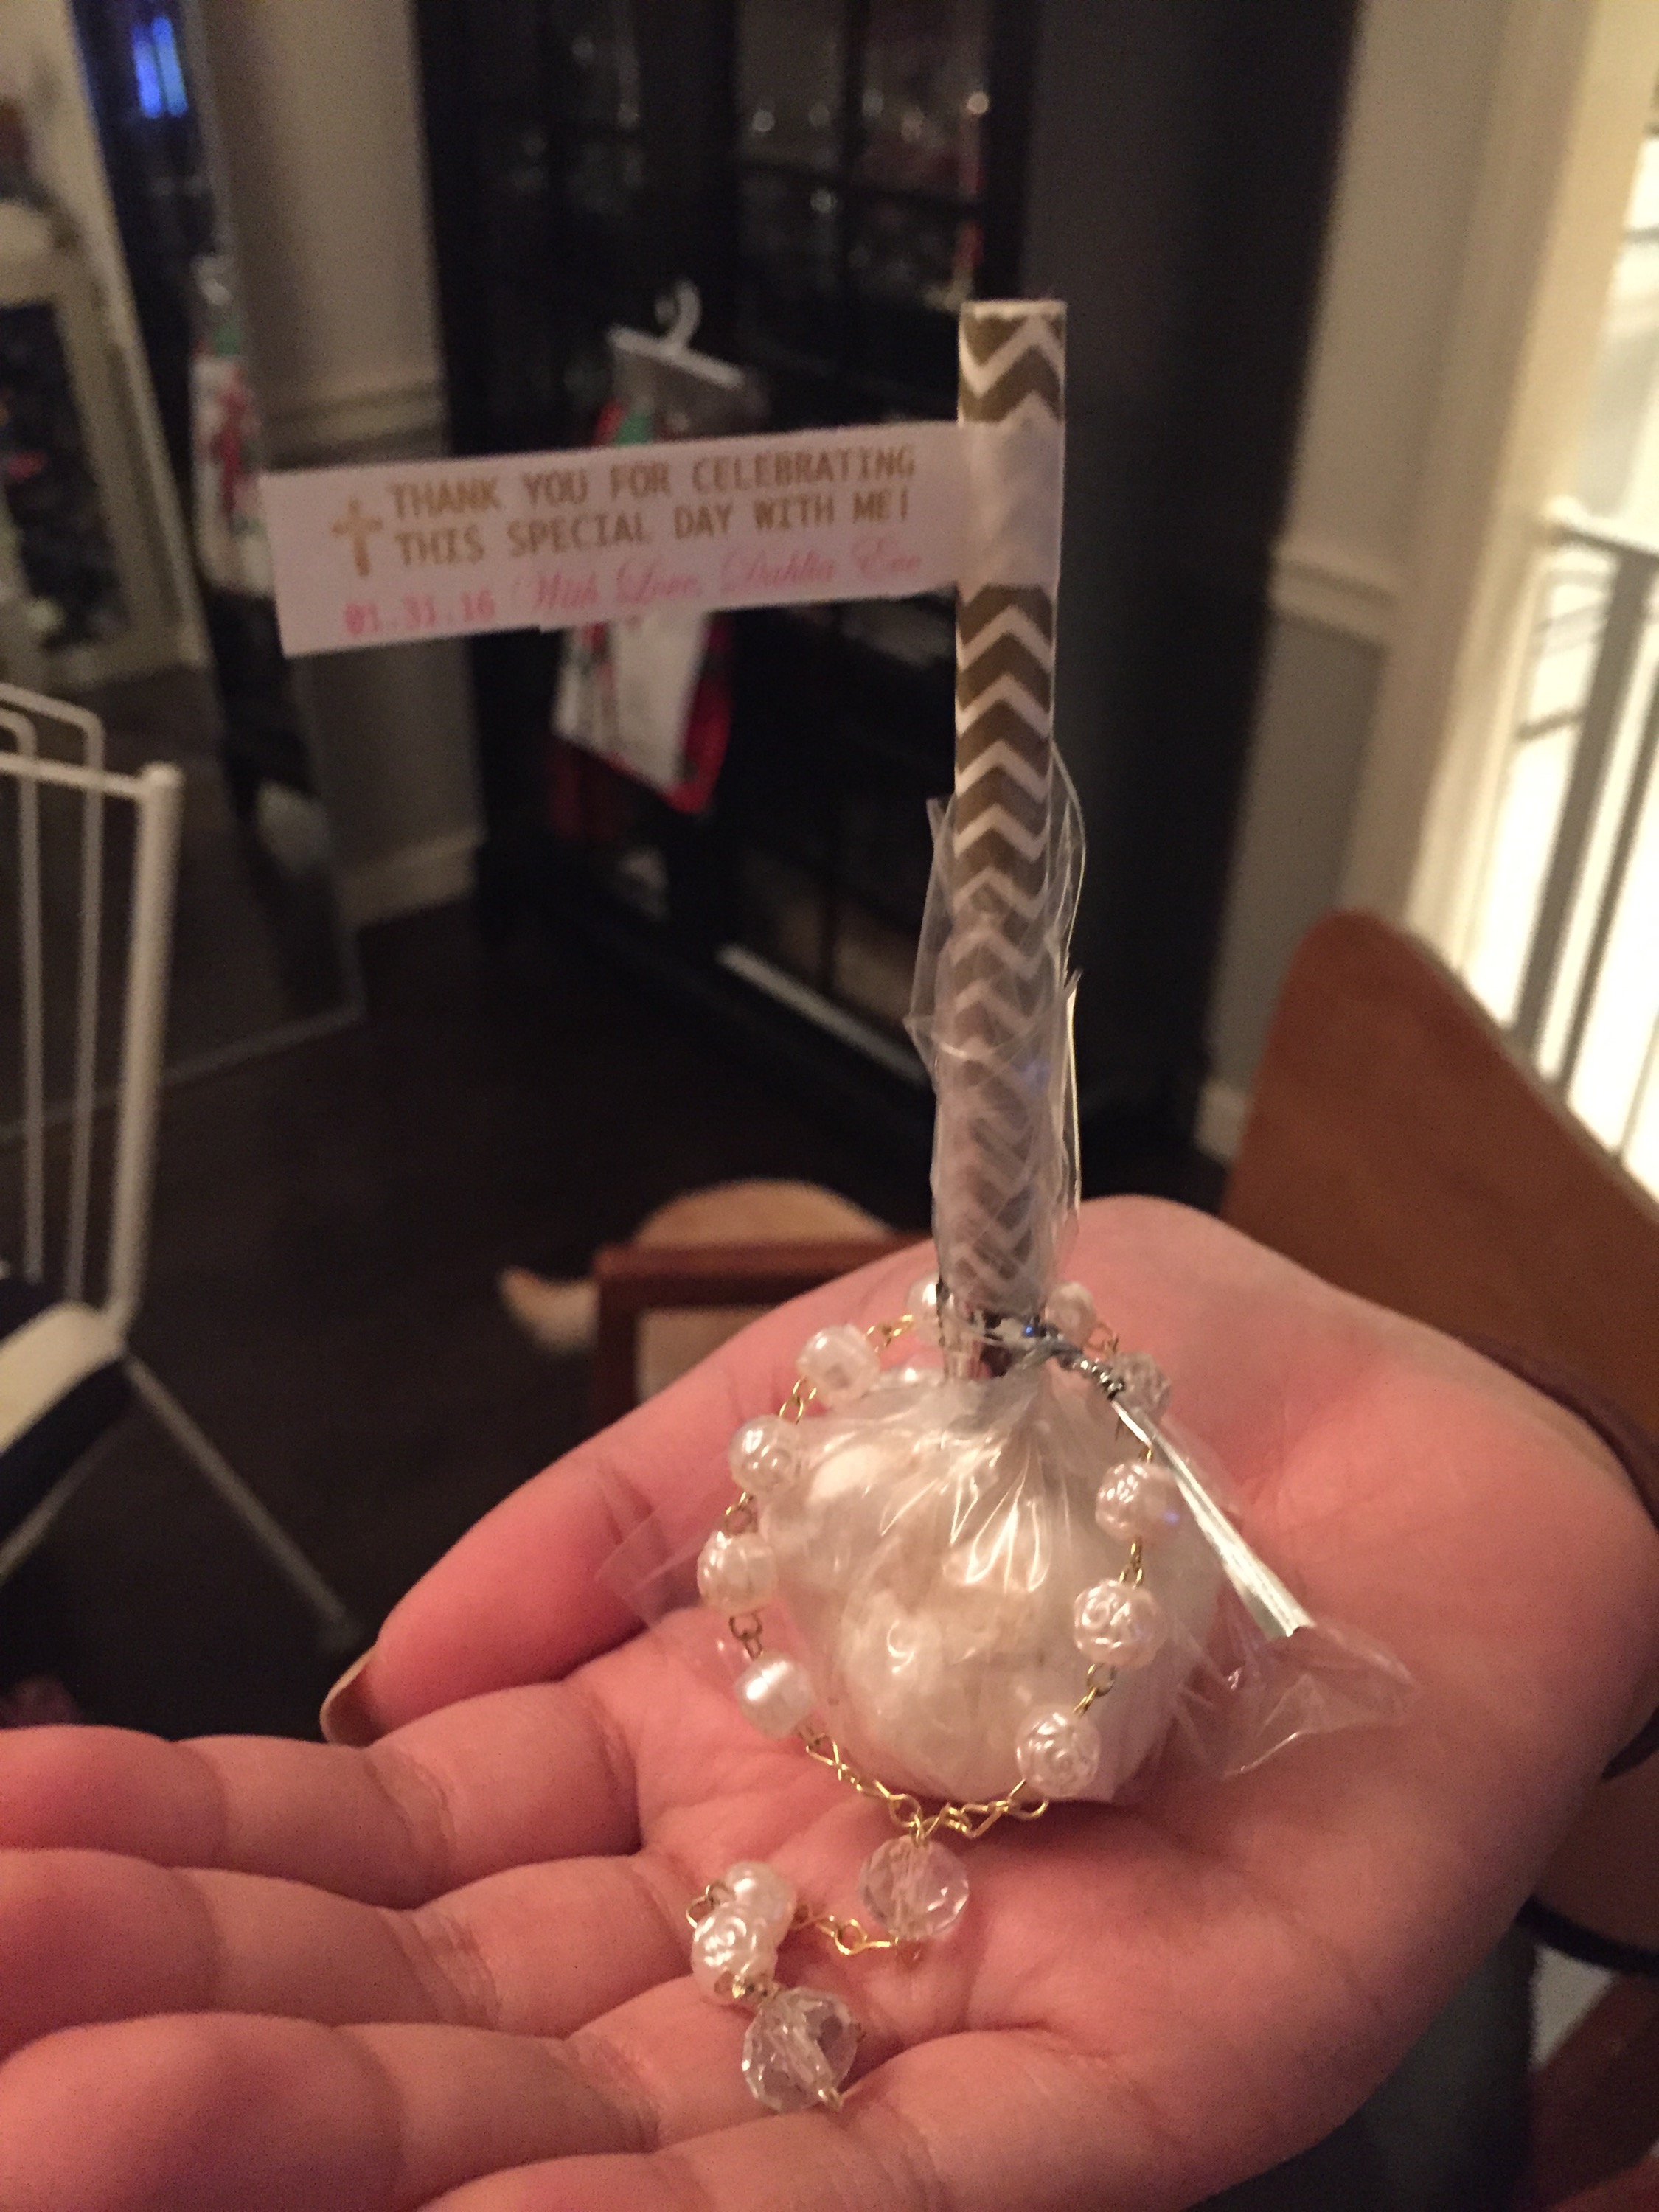
Note: we did these the night before, if you wait a few days, the cotton candy will disintegrate. It’s best to do it closer to the party date for freshness.
8. DIY Wooden Doll Cake Topper
So, I have created many Cake Toppers, including my own Wedding Cake Topper and have even sold over 50 to Friends, Family and on Etsy, so I especially wanted to make one for Dahlia on her special day.
I buy my wooden dolls on craftsparts.com. Each doll costs roughly 60 cents & if you buy in bulk it gets cheaper. I also used the Cake Topper stand from Michael’s.
I use acrylic paint to mimic Dahlia in her baptism dress and seal it with Modge Podge. Once it’s sealed, I use the Gorilla wood glue to attach and voila! A personalized Cake Topper. What’s even more special is now I can keep it as a keepsake from her special day. 
 9. DIY Ombre Food Labels
This was another super easy thing to do that didn’t cost a lot. I love labeling things and what better way to do that than to label the food items at a reception.
I love to watercolor and thought that I could use my watercolor paper to create paper tents to label the food. Once I folded the papers, I simply used my pink watercolor paint to ombre the paper tents. Once it dried, I used a gold paint pen to write the food item on it.


10. Use your Resources
While I am not much of a baker myself, I know plenty of people who love to bake! My friend that lives near my home and the church made delicious mango & strawberry panna cotta shooters that were the perfect size for a dessert. She also made cookies & cream & strawberry mini-cupcakes. Lastly, she baked the 9 in. round Pineapple Chiffon cake for us that was also pink ombre. We then added the cake topper I made and the paper flowers to top it off!
It’s always good to have people around you that are multi-talented, they might be less expensive than store bought items too. So, keep that in mind!
 I had so much putting together this small, yet special shindig for Dahlia. I hope she enjoyed the celebration and more importantly, the fact that she is now a part of God’s family and got to spend time with our friends and family as well!
As for you, I hope you got some easy DIY inspirations for your next gathering!
Cheers! And please enjoy the photos of the celebration!


Our sweet pets animals deserve much better than this lower price on finasteride camber
Diuretics mainly loop diuretics are also beneficial at treating edema and lymphedema cialis without a prescription